How To Build A Campfire In 10 Easy Steps (with images)
There are not many better ways to create lifelong family memories than the whole family cuddled up around a roaring campfire you made yourself. But, you will be singing and dancing around your campsite munching on uncooked marshmallows if you have not learned how build a campfire the correct, safe and responsible way. So today we are laying it all out in ten easy to follow steps with some images to give you a visual idea also..
[toc]
How To Build A Campfire – You are going to require
- Wood, Kindling, Tinder
- Lighter (Preferably a storm lighter)
- or Matches
- Small boulders or rocks
- A small shovel
- Gloves
Right, now we have the essentials to build the fire but before you get all gung-ho you better find out if your campsite actually permits campfires.
Most do, but some will, at certain times of the year have a ban on all campfires. (you seen what just happened in California, one stray ember can cause a LOT of damage to a dried-out forest)
Ok, so you have your permit, it’s time to move on to the fun stuff!
How To Build A Campfire – Step 1:
Pace out at least 12 feet (3.6 meters) from any nearby trees or long grass or bushes.
Note** Very Important. ALWAYS look above your head for any overhanging branches, power lines etc. The heat alone can cause dry branches to catch fire, so make sure all is clear overhead. .
Step 2: 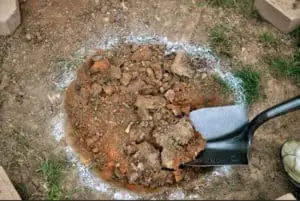
Now at your marked ‘Safe’ spot, dig a hole tapering out to the width of your finished fire (1.5 x 1.5 feet wide and about 3/4 foot of depth in the middle should be plenty)
Step 3: 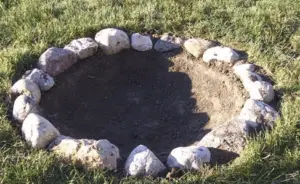
Now take your small boulders or rocks and place around the perimeter of your fire pit (This is a very important safety measure and keeps all your kindling contained in your fire-pit.
Step 4:
Now time to gather the wood and kindling for your fire. For this you will need a few different kinds.
1- Tinder – small twigs and leaves (They need to be dry)
2- Kindling – slightly larger than the smaller twigs, but need to be under about an inch in diameter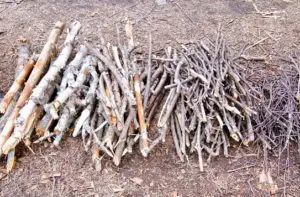
3- Fuel – Dry logs, larger dry branches, basically wood that will burn much longer.
Tip: Remove moss and any dirt from all the wood. Always keep any wood, tinder or kindling well away from the fire area (About 3 or 4 feet should do it)
Step 5:
Take a handful of your tinder and place it in the center of your pre-dug fire pit.
Step 6: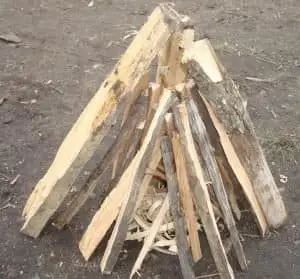
Now take a few of your pieces of kindling and build a sort of wigwam shape around your tinder. Do this process a couple of times building the wigwam shape around your tinder making it slightly bigger each time.
Start with shorter pieces of kindling and use longer pieces and so on. Keep the upwind side of the wigwam open to let you ignite the fire.
Step 7: Building A Campfire Log Cabin Style
Now it’s time to build the fuel wood around your wigwam. Take two logs and sit them parallel to one another on each side of the wigwam (The first two logs must extend slightly beyond the width of the wigwam. 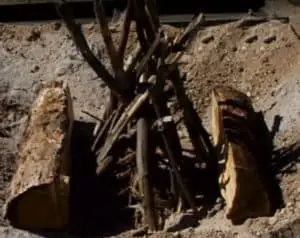
Now take another two logs and sit them parallel to one another sitting on the first two logs. You are building a sort of log cabin around your wigwam. Repeat this process until your log cabin is just below the height of your wigwam. 3 layers of fuel wood is normally enough to get you to the height of your wigwam, depending on your log fuel size.
You must keep in mind you need to access the tinder to light the fire so make sure this area is accessible to get your hand and lighter in there.
Step 8:
Now the fun part. Take your lighter or matches and light the tinder in a few different places. A good practice is to stand with the wind to your back to keep the match or lighter from blowing out, this is why I recommended a storm lighter at the start of this instruction.
Step 9:
Take some more tinder and feed the flames until your tinder is well and truly caught fire.
Step 10:
The kindling will burn fast so take your attention to the fuel logs. Add some more until you get that fuel timber to catch. Once that fuel wood catches add some more to your log cabin shape.
That’s it. You have made a safe roaring campfire. Time to get those marshmallows out, a few beers and let the singsong begin.
Wait… We are not quite done yet!
Final Stage:
How To Safely Put Out Your Campfire
Wind can lift smoldering embers up into the air and carry them a fair distance, setting forest and brush alight. It can cause devastation to the forest and wildlife, not to mention your fellow campers.
Putting out a fire correctly can take a bit longer than you might think. Make sure you work on putting the fire out completely at least 20 minutes before you leave camp or head off to bed.
This actually should have went into the steps of creating the fire at the start of this post as it’s a fire safety MUST DO! Have a good sized bucket of water on hand at all times, this serves as your fire extinguisher.
DO NOT pour over the fire at once, keep your fellow campers in mind here, they could use your nicely built dug out fire pit if its not flooded with water once you leave. Its good camping karma after all ?
So, sprinkling the water over the fire is the name of the game here.
Stir the embers.
As you gently sprinkle the water over the dying fire, mix and stir the embers with your shovel, or use a thick stick instead, making sure the all the embers and ashes are wet through. If you cannot see steam or cannot hear any sounds when the water hits the ash and embers its pretty much out.
Test it by touch
Do not be the guy who tries to grab a bunch of ashes to check if its cool. Use the back of your hand close to the ashes to check for rising heat, if there is some then its needing more water. Just keep adding water until you are fully satisfied its completely out and cool.
Good Camping Karma
Thinking about the campers who might stumble upon your nice fire-pit, would it not be nice for them if it was clean of ashes and ready to be used right away? It takes two minutes to clean out the old ashes and leave it in a usable condition. Now that feels good right?
Job done.
A fun time had by all and left in a safe, clean and tidy manor?
Looking for some awesome campfire deserts you can make on your newly built campfire? The kids just LOVE these desserts. Read it HERE.
We love feedback, good or bad. Any questions or suggestions you have about this post please drop a comment in the section below. Thanks.
Why not follow us on pinterest and instagram, links below.
Follow us on Pinterest Here
Follow us on Instagram Here